Add 'Send an e-mail' actions
Now you need to add Send an e-mail actions to each case.
Use the mail builder to create a predefined e-mail. In your mail, use placeholders to automatically add the input data from the trigger form when the flow runs.
In the Check box enabled case click
 Add under the Find participant action. The panel opens.
In the User interactions section click Send an e-mail.
In the Name field, enter Send e-mail with copy to me.
Click Open mail builder. The mail builder opens.
Click
 Placeholders. The Variables panel opens.
Click
Add placeholder to add the following custom placeholders:subject
user
link
comment
sender
Click the arrow at the end of the field after entering each placeholder.
Drag the subject placeholder into the subject line of your e-mail.
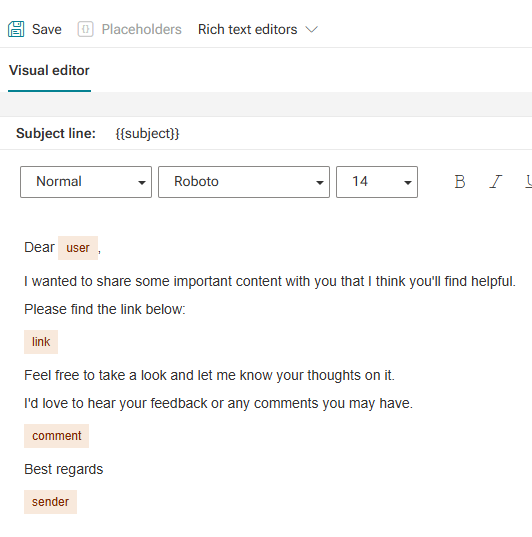
In the e-mail body, enter your e-mail text and use your custom placeholders as shown in the example:
Click
 Save.
Save.Close the mail builder.
In the Send e-mail with copy to me panel, click
 Open mapping panel next to the To field. The Define mapping panel opens.
In the Dynamic content list, select Recipients. The panel closes.
Set the Cc and map the data for the recipient of the copy. You want the copy to be sent to the person who starts the flow.
In the Send e-mail with copy to me panel, enable Cc.
Click
Open mapping panel next to the Cc field. The Define mapping panel opens.Click Find participant, and then select Participant. The panel closes.
Map the data for the comment placeholder. You want the placeholder to be automatically replaced by the input in the Comment field of your form.
Click
Open mapping panel next to the comment field.In the Dynamic content list click Comment.
Map the data for the link placeholder. You want the placeholder to be automatically replaced by a link to a model.
Click
Open mapping panel next to the link field.Enable Advanced expression.
Click Operator to display all available operators.
Click Get element at position.
Position the mouse cursor inside the brackets.
Click Dynamic content to display the list.
Scroll down and click Get model links, then select Model links. The advanced expression for this action is entered.
Enter ,1 after the closing curly bracket since this expression is an array and you have only linked one model.
Your advanced expression is now:
ELEMENT_AT(${Get model links#2.outputMessage.return},1)Click Apply. The panel closes.
Map the data for the sender placeholder. You want the placeholder to be automatically replaced by the name of the person who starts the flow.
Click
Open mapping panel next to the sender field. The Define mapping panel opens.In the Dynamic content list click Initiator name.
Map the data for the subject placeholder. You want the placeholder to be automatically replaced by the input in the Subject field of your form.
Click
Open mapping panel next to the subject field. The Define mapping panel opens.In the Dynamic content list click Subject.
Map the data for the user placeholder. You want the placeholder to be automatically replaced by the recipient's name.
Click
Open mapping panel next to the user field. The Define mapping panel opens.Scroll down and click Get participant name, then select Name.
Click
Save.Right-click the Send e-mail with copy to me action and select
 Copy.
Copy.In the Check box disabled case right-click
Add under the Get participant name action and select  Paste. A copy of the Send e-mail with copy to me action is added to the case.
In the Name field, enter Send e-mail without copy.
Click
 Reset mapping to original state next to the Cc field.
Click Reset.
Disable Cc to send the e-mail without a copy.
Click
Save.